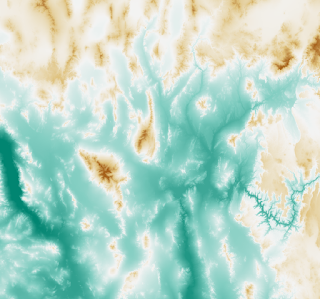
After few hours of research, here is a solution to solve the difference of greys between the tiles imported in QGIS.
QGIS does not read the tiles as an image, but the program creates the image from the information given by the file to translate elevations into colors. QGIS will take the lowest and the highest level of each tile to create a shade from white to black (or red to blue or any other shade of colors). This can quickly bring to errors because the black won't be affected to the same elevation on different tiles. Same problem with the white.
To correct the way how QGIS will read the tiles, we need to find the lowest and the highest values. To estimate those values I have opened a new project with the tile showing the maximum of white areas and I have followed the instructions from the Harvard website. I have divided the intervals to 100. As a minimum I have written 0 and 5000 for the maximum. The nuances were a lot more detailed than the grey scale but the top of the mountain was not enough pronounced so I have changed the maximum value to 3000 which was much better.
...
Once the layer is set up, I have copied the settings and applied them to the other layers following the instruction here. As a result,
NOW READ THIS !
YOU DO NOT NEED QGIS TO CREATE THE TERRAIN !
While trying to find an easier way than GDAL to convert a Geotiff file into a RAW, I found VTBuilder, thank you to ApterixK on this forum. Here is how to use it:
- Download the *.EXE file on this page.
- Install the program.
- Open the program.
- Go in Layer >>> Import data.
- Select Elevation and select an *.adf file you downloaded on the USGS website. It shall take few minutes to open.
- Go to Elevation, then Export to.
- Select to convert into a RAW file for Unity.
- The program exports the RAW file.
- Open the RAW file with Photoshop.
- Convert into 16 bits and verify the grayscale is on.
- Scale the image 2048 x 2048 (or 1024 x 1024).
- Save as the final RAW image that you can import into Unity.
...
That's it. It was very simple. I'll compile my terrain now and will post the results later.
REFERENCES:


0 commentaires:
Post a Comment